Moving my blog to github, from now on you can find me here: https://arenhage.github.io/
Presentation-poll
Some weeks back i was given an idea from a colleague of mine, they were going to have a workshop with a larger group of people and needed some way to keep track of people were on the right track following along. This sprung the idea for the little application i now have created namely Presentation-poll.
Its a very tiny application, but it gets the job done! And also i got to learn some new stuff regarding the DDP Server/Client handling in Meteor which opened up some new ideas for this application.
What it was initially intended for was to keep track of a unique vote from a single individual and present the result in real-time.
Initially, in order for me to keep track of every individual vote (yes/no/blank), each participant had to state some form of name on which i could store unique information including his/her current vote. And with Meteors real-time architecture, this could be reflected on the common result accordingly. And this worked fine, but i wanted to simplify it even further.
So i turned to the idea of only keeping track of this based on active connections to the current poll, but with the exception that i did not want to introduce any other third party web-socket libraries in order to achieve this. Since Meteor is working with websockets continuously i was hoping that i could achieve this using what is already given to me by Meteor core.
And it turns out that i was able to achieve this by hooking onto the DDP server as well as checking the current connection of the client, fairly simple.
Basically what i do is that whenever a client jumps into a specific poll. The client will register its last known session id by looking at its current websocket connection id to the DDP server. Like so:
Meteor.connection._lastSessionId
The only other thing i needed to keep track of was when ever a client dropped its connection towards the DDP server, deregister it from the current poll and drop its vote if a vote was cast so that the calculations is done on the correct number of connected clients.
This was also easily achieved by simply stating that for any connection made to the DDP server, register an onClose for the connection. When onClose is called (when the connection is dropped) simply deregister it from the poll, removing its vote and data. For example:
Meteor.onConnection(function(connection)  {
    connection.onClose(function() {
        SomeCollection.remove({sessionId:connection.id});
    });
});
Meteor + Ionic
So, i had a session trying out the new Ionic support for Meteor! My expectations were high and the experience was pleasant. I ended up doing a small angular-meteor application, scraping some information of my companies list of employees, neatly wrapping it in Ionic framework. You can read the full blog post here if interested! The source code for the application can be found on my git-repo!
Meteor + Ionic, oh how i have waited…
With the new official Angular support in meteor 1.2, a lot of new and exciting stuff is starting to emerge in the meteor eco-system. The most recent being the newly official support with the hybrid mobile application framework Ionic. This is something that i have been waiting for since i first started using Meteor. The necessity of being able to create nice and neat mobile applications without being a css god is something that i have missed out in the meteor family up until now. Having used ionic prior to meteor im exited to try out if it will run as smoothly as it does native Ionic with the reactive power from Meteor. Exciting stuff!
List contains element in bash
I just came across this nice way of verifying if a list contains a specific element in bash.
containsElement () { for e in "${@:2}"; do [[ "$e" = "$1" ]] && return 0; done; return 1; }
a_list=("foo" "bar")

if containsElement "$1" "${a_list[@]}"; then
echo "$1 found in a_list!"
fi
kudos to the op of this solution : stackoverflow
Meteor Update Highchart Dynamically
Reactiveness is always key when we are working in Meteor. Hence it would be nice if we could deliver fully reactive charts with little effort. Thankfully this is very easy using the highcharts package!
A similar approach will probably be applicable for the other chart libs, but highcharts was very straight fortward, so here goes!
In our template we simply add a container for our alleged chart, in this case im planning on filling it with a pie-chart
<div id="piechart" style="width: 200px; height: 200px;"></div>
Since we want this chart to be reactive, any changes to our data-source for this chart needs to be take care of. This can easily be achieved bymaking use of the Meteor Observe
Basically what observe does is that it observes a query providing a cursor triggering specific events. In our case we want to monitor change events.
Highcharts then provides a very handy method setData on its series object, which conveniently lets us update the data on for this chart.
//make chart
$('#container-pie').highcharts(options);
//monitor changes and update chart
CollectionWithPieInformation.find({}).observe({
    changed: function(newDoc, oldDoc) {
        //newDoc is the full new document including changes.
        var series = $('#container-pie').highcharts().series[0];
        series.setData(newDocument.data);
    }
});
Basically this is it, given that our find({}) will return a document with a field data matching the format expected by the chart. any state change to the database will be observed by the meteor application and applied to the chart accordingly!
$(‘#piechart’).highcharts(options);
how to configure your highchart options can be found in the highchart documentation, or e.g in this example
Meteor session and Date
Not 100% sure this has been included or not in the most recent release of Meteor, but for a time there was a problem when trying to store dates in the Meteor Session object due to JSON-compatibility issues and the hot code push.
For those whos still running on a version experiencing problems storing dates in session, the way i worked around this was simply to use moment with two helper methods.
getChosenDate = function() {
    return moment(Session.get('chosenDate'));
};

setChosenDate = function(date) {
    Session.set('chosenDate', date.valueOf());
};
Meteor, rapid and fun!
So the last couple of days i have been exploring the world of Meteor, a platform for building mobile and web applications in pure javascript. The undeniable conclusion is, its rapid, rapid fast development for those already comfortable with javascript.
But more interesting is the way we think when we are programming meteor. The reactive thinking using the publish/subscribe model is very powerful if you do it right, but that doesnt necessarily mean that you do. If you are not familiar with publish/subscribe which i would like to say originate from the world of messaging, it can be some what of a threshold to surpass, but once you wrap your head around it, it will bring you a lot of interesting concepts to explore.
The only thing so far that i have found quite devious is the native problem with javascript, the load order of the files. Meteor tries to solve this by introducing a “special folders” concept, where folders containing your script files are intended to be loaded before another. However i can only imagine what will happen when your project grows larger.
In any case! Meteor is great fun, and i think this is only the tip of the iceberg with this style of programming. Cant wait to see where this is headed!
For those interested, my reference project was to create a traffic service which collects data from a public api, displaying it in a graph and make it mobile friendly. Thi intention is to notice the peak times when the destinations are crowded, so that you can plan ahead accordingly! Check it out if you want to see it in action!
tmp-space a node.js express application
Recently i got interested in trying out the gridfs specification for storing blobs in mongodb. Also it is always fun to play around with node.js so i ended using this for my server setup.
The Application
The server application is a running node.js application with express as its web-framework. The application exposes a series of express routes which allows the user to create spaces, upload and remove files. Each space created is created with a timer which represents the life-cycle of the newly created space. When the space timer has run out, the space is removed along with all files uploaded to that space, simply put.. its a tmp-space.
There is really no special handling in this application what so ever, it is merely a statement of how easy it actually is to store and manage files within mongodb using the gridfs implementation.
Just how easy is it?
Using express we can simply upload a file by form and serverside utilize the temporary files generated to get a hold of our uploaded file data.
In this example lets assume i have an open connection to mongodb using mongoose, which is passed to gridfs to instantiate the gridfs driver. In this example I am using gridfs-stream.
    var gfs = Grid(conn.db, mongoose.mongo);
    var tempfile = req.files.file.path;
	var originalFilename = req.files.file.name;
	var writestream = gfs.createWriteStream({
		filename: originalFilename
	}).on('close', function(file) {
                //will send a success to caller
		res.send(file);
	});

	// open a stream to the temporary file created by Express...
	fs.createReadStream(tempfile)
	.on('end', function() {
	})
	.on('error', function() {
	})
	.pipe(writestream);	//pipe it to gfs writestream and store it in the database
};
gridfs will handle all in between logic, adding and removing file metadata and the actual file chunks in our database. The files is stored in two separate collections:
fs.files -> contains file metadata
fs.chunks -> contains file chunks
Using gridfs, we can now easily grab files and stream them back with the user request:
var readstream = gfs.createReadStream({
    _id: req.params.filesId,
});
readstream.pipe(res);
also we can simply modify the response headers depending on how we want to respond to the caller
res.setHeader('Content-type', data.contentType);
res.setHeader('Content-disposition', 'attachment; filename=' + data.filename);
have a look and try it out! http://tmp-space.com
Running Node.js application as a Windows Service using NSSM
Came across an easy way of deploying your Node.js application as a Windows Service using NSSM (Non-Sucking Service Manager)
To do the following you will need to running the command-prompt as Administrator.
NSSM is available for download at:
http://nssm.cc/
Go to the NSSM install directory (win32 or win64) and type
> nssm.exe install
Under ‘Application’
Path: <path to node installation>/node.exe
Startup directory: <path to node project application root>
Arguments: <application main>
—————————
EXAMPLE
—————————
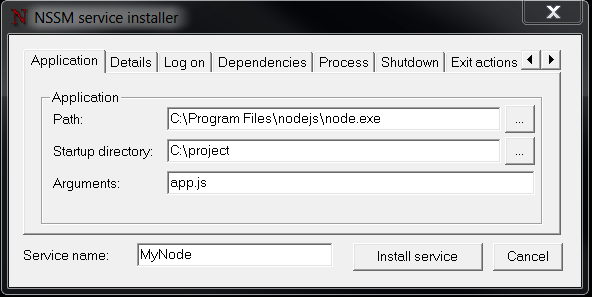
The remaning tabs is for further fine tuning.
